
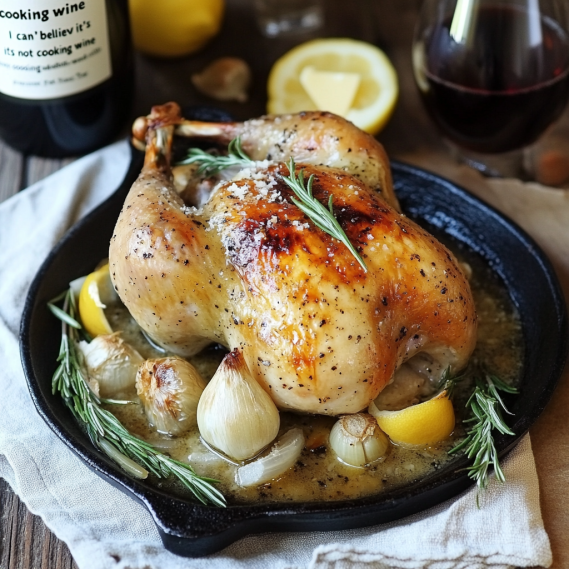
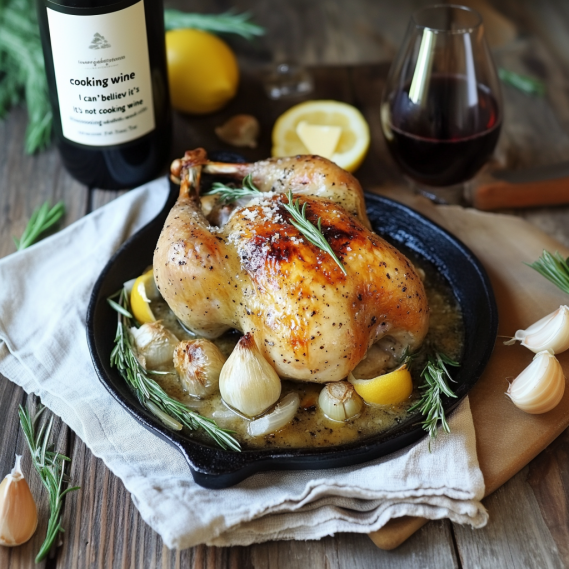
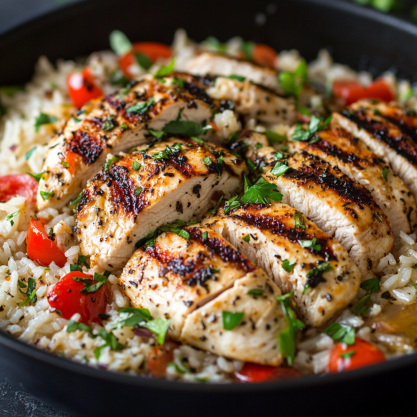
Rustic Roasted Garlic Chicken with Asiago Gravy
Okay, let me tell you about THE chicken recipe that literally saved my dinner party reputation. Picture this: it’s three years ago, my in-laws are visiting for the first time, and I’m sweating bullets in my kitchen because my mother-in-law is one of those people who casually mentions she “used to cater.” No pressure, right?!
I stumbled across this recipe in a dog-eared cookbook I’d borrowed from my neighbor (and never returned—sorry, Jen!). The minute I pulled this chicken out of the oven, my tiny apartment filled with a smell so incredible that my husband actually stopped watching the game to wander in and ask what that “amazing smell” was. When my mother-in-law asked for the recipe TWICE during dinner, I knew I’d found my holy grail chicken dish!
Let’s be real—the star isn’t even the chicken (though it’s fall-off-the-bone tender). It’s this ridiculous Asiago gravy that I’ve literally eaten with a spoon when nobody’s looking. There have been times I’ve made a double batch “for leftovers” when we all know it’s just for me to enjoy with a glass of wine after the kids go to bed. No regrets!
Don’t let the fancy name fool you. I once made this while simultaneously breastfeeding my newborn and helping my toddler find his missing dinosaur toy. If I can pull this off during the peak chaos years, you’ve totally got this!
Kitchen Equipment You’ll Need
Grab these from wherever your kitchen tools are hiding (in my case, some are probably still in the dishwasher from three days ago):
- A roasting pan with a rack (that wedding gift you rarely use is finally getting its moment!)
- Some small oven-safe dish for the garlic (I use that chipped Pyrex that’s too sentimental to throw away)
- Aluminum foil (the answer to all kitchen problems)
- Kitchen twine (or honestly, that clean cotton string from your junk drawer works just fine—been there!)
- Meat thermometer (absolute non-negotiable unless you enjoy playing chicken roulette with your digestive system)
- Medium saucepan (the one that doesn’t have that weird burnt spot on the bottom)
- Whisk (or fork if you’re in a “where are all my utensils?!” situation)
- Measuring cups and spoons (eyeballing it is for the brave)
- Knife and cutting board (the less dull one, please)
- Fine mesh strainer (totally optional—I use this maybe 10% of the time when I’m feeling fancy or my mom is coming over)
Ingredients Overview
We’re starting with a good-sized chicken—about 1.8-2 kg (4-4.5 pounds). I try to get free-range when I can afford it, but listen, sometimes it’s just whatever’s on sale that week. No judgment here!
The herbs are fresh if you remembered to buy them and they haven’t turned to science experiments in your veggie drawer. The first time I made this, I actually snipped some from my neighbor’s garden when she wasn’t looking (I’ve since confessed and now she grows extra for me).
Now, about the garlic—FOUR whole heads. Not cloves. HEADS. The first time I read that, I thought it was a typo. It’s not! Trust me on this one. My garlic-hating brother-in-law had thirds of this chicken and never suspected a thing. Once roasted, it turns into this sweet, spreadable magic that doesn’t give you dragon breath. Promise!
And the gravy… oh lord, the gravy. It’s got butter (because I’m not a monster), wine (cooking wine = one for the pan, one for me), and Asiago cheese that creates this tangy, nutty flavor bomb. My dad, who claims he “doesn’t like fancy food,” literally picked up his plate and licked it clean the first time I made this. At age 67. At my dining room table. In front of my boss who I’d invited for dinner. That’s the power of this gravy, people.
Ingredients
- 1 whole chicken (1.8-2 kg/4-4.5 pounds) – whatever fits your budget and isn’t still frozen because you forgot to thaw it (been there!)
- 4 whole garlic heads – yes, HEADS, not cloves. Go big or go home!
- 45 ml (3 tablespoons) olive oil – the one that doesn’t have the layer of dust on it
- 15 g (1 tablespoon) fresh rosemary, chopped – those little pine needle-looking things
- 15 g (1 tablespoon) fresh thyme leaves – the tiny leaves that get stuck under your fingernails
- 15 g (1 tablespoon) fresh sage, chopped – those velvety leaves that smell like Thanksgiving
- 12 g (2 teaspoons) salt – more than you think you need, less than would give your doctor a heart attack
- 8 g (1½ teaspoons) black pepper – freshly ground if you’re not too lazy to twist the grinder
- 1 lemon, quartered – use that slightly wrinkly one in the fruit bowl
- 1 onion, quartered – no need for pretty cuts, it’s just going inside the chicken where no one will see it
- 120 ml (½ cup) white wine – something you’d actually drink (I use “cooking wine” from the glass already in my hand)
For the Asiago Gravy (aka Liquid Gold):
- 45 g (3 tablespoons) butter – the real stuff, not that “I can’t believe it’s not” nonsense
- 30 g (¼ cup) all-purpose flour – yes, the one with the mysterious crusty bits around the rim of the container
- 480 ml (2 cups) chicken broth – homemade if you’re that person, store-bought if you’re me
- 120 ml (½ cup) white wine – see above about “cooking wine”
- 120 g (1 cup) grated Asiago cheese – pre-grated works but freshly grated is worth the knuckle scrapes
- 120 ml (½ cup) heavy cream – because we’re living our best lives here
- Salt and pepper to taste – you know your sodium tolerance better than I do
Step-by-Step Instructions
Preparing the Chicken and Garlic
- Crank your oven to 200°C (400°F). This is hot enough to get that skin crackly but not so hot that your smoke detector gets involved (again).
- Grab those garlic heads and chop the tops off like you’re beheading tiny vampires. Nestle 3 heads in a baking dish, drizzle with olive oil (be generous—this isn’t the time for that diet you’ve been meaning to start), and cover with foil. Set these aside for their spa treatment.
- Take your chicken and remove that weird paper package of mystery parts from the cavity. You know, the one you always forget about until you’re halfway through cooking? Just me? Pat that bird dry with paper towels like it just ran a marathon. The drier the skin, the crispier it gets—it’s science, people!
- Mix up your herb blend. This is where your kitchen transforms from “where did the dog throw up?” to “is there a 5-star restaurant in here?” If you want to feel fancy, chop those herbs with your biggest knife on a wooden board while making that chef-y rocking motion. If you’re like me on a Tuesday, just hack at them with kitchen scissors directly over the bowl.
- Now for the weird part—stick your fingers between the chicken skin and meat to create a pocket. Yes, it feels exactly as gross as you’re imagining. Try not to tear the skin, but if you do, nobody will know but you and the chicken. The first time I did this, my 5-year-old walked in and yelled “MOMMY’S GIVING THE CHICKEN A MASSAGE!” and honestly, that’s not inaccurate.
- Peel some cloves from your remaining garlic head and slice them thin. Slide these under the chicken skin like you’re stuffing cash into a stripper’s G-string—evenly distributed for maximum effect. (My husband would die if he knew I just wrote that, but IT’S TRUE.)
- Give your chicken a nice oil rubdown. Don’t be shy—get all up in those nooks and crannies. Then coat it with your herb mixture, making sure to season inside the cavity too. The first time I made this, I forgot to season the cavity and I still haven’t lived it down at family gatherings.
- Stuff those lemon and onion quarters into the cavity. I once told my kids this was “giving the chicken a healthy snack” which they thought was hilarious. Whatever works, right?
- Tie those chicken legs together with kitchen twine. The goal is to make it look like the chicken is relaxing at the spa, not like it’s been hog-tied by an amateur. Tuck the wing tips under the body so they don’t burn and look like sad little T-Rex arms.
Roasting
- Place your chicken on the rack in your roasting pan, breast-side up looking all fancy like you know what you’re doing.
- Slide both the chicken and your dish of garlic heads into the oven. Set a timer because you WILL forget otherwise while scrolling through Instagram.
- After about 35-40 minutes, check the garlic. It should be golden and soft—like squeezing a stress ball that happens to smell heavenly. Pull it out but leave the chicken to keep doing its thing.
- Keep roasting that chicken for about 1 hour to 1 hour and 15 minutes total. Use your meat thermometer to check the thickest part of the thigh—you’re looking for 74°C (165°F). This is not the time to “wing it” unless food poisoning is on your bucket list.
- When your chicken is done, move it to a cutting board and tent it with foil. Let it rest for 15 minutes. I know you want to dive in face-first, but this resting time is when all those juices redistribute. Last Thanksgiving, my brother-in-law carved the bird straight out of the oven and I nearly stabbed him with the serving fork. Patience, people!
Making the Asiago Gravy
- While your chicken’s having its power nap, pour the drippings into a fat separator if you have one. If not, just spoon off most of the fat like I did for the first five years I made this recipe before finally buying a fat separator from the dollar store. Life-changing.
- Grab a saucepan and melt that butter over medium heat. Inhale deeply because this is what heaven smells like.
- Sprinkle in the flour and whisk like you’re trying to win a whisking marathon. Keep at it for 2-3 minutes until it turns golden and smells nutty. This is a roux, which is French for “don’t stop whisking or it’ll burn and you’ll have to start over.”
- Slowly—and I cannot stress this enough—S-L-O-W-L-Y add the chicken broth while whisking. The first time I made this, I dumped it all in at once and ended up with something resembling chunky wallpaper paste. Learn from my mistakes.
- Add the wine (after taking a sip for yourself—chef’s privilege) and let it simmer until it starts to thicken, about 5 minutes. Your kitchen should smell so good right now that your neighbors might “coincidentally” drop by.
- Now for the best part—squeeze those roasted garlic cloves out of their skins right into your gravy. It’s weirdly satisfying, like popping bubble wrap or peeling off a face mask. They should slide out like butter. Whisk them in and watch them practically dissolve.
- Lower the heat (we’re entering the danger zone of potential cheese clumping) and gradually stir in the Asiago cheese. Watch it melt into stringy, cheesy heaven. Take a test taste at this point. And another. And maybe one more just to be sure.
- Pour in the cream and add those few fresh thyme leaves that make it look like you know what you’re doing. Give it a final seasoning with salt and pepper.
- If you’re feeling extra or trying to impress someone, strain the gravy through a fine mesh strainer. Full disclosure: I’ve only done this twice—once when my food snob cousin visited and once when I was procrastinating cleaning the bathroom.
- Keep your liquid gold warm until serving time, possibly defending it from family members trying to sneak early tastes. (I caught my husband drinking it from the ladle once. I married a savage.)
Recipe Tips
- Want a super juicy chicken? Brine that baby! Just soak it in salty water (4 tablespoons salt in 4 cups water) for a few hours in the fridge. This has saved many a dry chicken in my household, especially that time I got distracted by a Real Housewives marathon.
- Save every single bit of that roasted garlic! I once caught my husband spreading leftover roasted garlic on toast at midnight like it was Nutella. I’ve never been more in love with him.
- No kitchen twine? I’ve used everything from unflavored dental floss to my daughter’s rainbow loom string in desperate times. Innovation is the mother of “oh crap I forgot to buy twine again.”
- Let your chicken hang out at room temperature for about 30 minutes before roasting. Cold chicken straight from the fridge cooks unevenly. Use this time to pour yourself a glass of wine and pretend you’re on a cooking show.
- If your gravy gets stringy from adding super hot cheese, don’t cry! Just take it off the heat for a minute before adding the cheese. I’ve salvaged many a broken gravy this way while silently cursing under my breath.
- WAIT. FOR. THE. CHICKEN. TO. REST. I know you’re hungry and the smell is killing you, but cutting into it too soon is like waking a sleeping baby—nothing good comes from it, and there will be tears.
What to Serve with This Recipe
This chicken plays nicely with so many sides! My family’s favorites:
- Mashed potatoes so creamy they should be illegal. Sometimes I add some of the roasted garlic to these too because I’m a garlic fiend and refuse to apologize for it.
- Roasted root vegetables that caramelize in the oven. Toss carrots, parsnips, and turnips with olive oil, salt, pepper, and a drizzle of honey. My 7-year-old who “hates vegetables” mysteriously cleans his plate when I make these.
- Steamed green beans or asparagus with lemon butter. Something green makes me feel like a responsible adult, even when I’m on my third helping of gravy.
- A simple green salad that nobody actually eats because they’re too busy sopping up gravy, but I still make it to feel virtuous.
- Crusty bread for gravy-soaking purposes. The heel of the bread is the best tool for this job, which is why I no longer let my husband throw it away “because nobody likes the end pieces.”
- Wild rice pilaf with dried cranberries and toasted pecans when I’m trying to impress people. It looks fancy but is actually stupid easy.
Frequently Asked Questions
Can I make this recipe ahead of time? Absolutely! I often prep everything the night before while binge-watching Netflix. The gravy reheats like a dream—just add a splash of broth if it’s thickened up too much in the fridge. Last Christmas, I made the gravy two days ahead, and it was even better after the flavors had time to get friendly with each other.
What if I can’t find Asiago cheese? First, moment of silence for your cheese selection. Then, swap in Parmesan, Pecorino Romano, or Gruyère. Each brings its own personality to the party. Once, during a snowstorm, I used that pre-grated “Italian blend” from the back of my cheese drawer that was dangerously close to its expiration date. Still delicious, though I’ll deny saying that if any Italian grandmothers are reading this.
How do I store leftovers? In the rare unicorn scenario where you have leftovers, store the chicken and gravy separately in the fridge. They’ll keep for about 3 days, though they’ve never lasted that long in my house. True confession: cold chicken straight from the fridge at midnight is one of life’s secret pleasures, especially when dipped in cold gravy. Don’t @ me.
Can I use dried herbs instead of fresh? I see you, person who forgot to buy fresh herbs again! Yes, use dried herbs, but only about a third of the amount since they’re more potent. Will some food snob be able to tell the difference? Maybe. Will your family still devour it like wolves? Absolutely.
What can I use instead of white wine? Not a wine household? Use chicken broth with a splash of white wine vinegar or lemon juice. Apple cider works surprisingly well too. Once, when I was out of wine (the horror!), I used the last inch of a forgotten bottle of champagne from my anniversary. My husband still asks for “that fancy chicken with the champagne sauce” like I’m some kind of culinary genius instead of someone who just used what was about to go down the drain.
Help! My gravy is too thick/thin! Gravy too thick? Add more broth, a splash at a time. Too thin? Mix equal parts flour and cold water, then whisk this slurry into your simmering gravy. I’ve rescued many a sad gravy this way, including the Great Thanksgiving Gravy Disaster of 2018 that we do not speak of.
There’s something magical about a perfectly roasted chicken that makes everyone at the table feel loved and cared for. This recipe has seen me through new babies, job promotions, family visits, and one particularly memorable power outage when we ate by candlelight and pretended we were fancy instead of dealing with an electrical emergency.
The combination of juicy chicken, mellow roasted garlic, and that ridiculous Asiago gravy creates a meal that tastes like you spent all day in the kitchen when really you just popped it in the oven and went back to your true crime podcast. It’s my ultimate “fake it till you make it” dinner that has never once let me down.
So the next time you want to fill your home with mouthwatering smells and your family with delicious food, give this recipe a whirl. And when someone inevitably asks for your secret, you can either share the recipe or just smile mysteriously and change the subject. I won’t tell if you don’t!
Rustic Roasted Garlic Chicken with Asiago Gravy
Ingredients
Equipment
Method
- Preparing the Chicken and Garlic
- Crank your oven to 200°C (400°F). This is hot enough to get that skin crackly but not so hot that your smoke detector gets involved (again).
- Grab those garlic heads and chop the tops off like you're beheading tiny vampires. Nestle 3 heads in a baking dish, drizzle with olive oil (be generous—this isn't the time for that diet you've been meaning to start), and cover with foil. Set these aside for their spa treatment.
- Take your chicken and remove that weird paper package of mystery parts from the cavity. You know, the one you always forget about until you're halfway through cooking? Just me? Pat that bird dry with paper towels like it just ran a marathon. The drier the skin, the crispier it gets—it's science, people!
- Mix up your herb blend. This is where your kitchen transforms from "where did the dog throw up?" to "is there a 5-star restaurant in here?" If you want to feel fancy, chop those herbs with your biggest knife on a wooden board while making that chef-y rocking motion. If you're like me on a Tuesday, just hack at them with kitchen scissors directly over the bowl.
- Now for the weird part—stick your fingers between the chicken skin and meat to create a pocket. Yes, it feels exactly as gross as you're imagining. Try not to tear the skin, but if you do, nobody will know but you and the chicken. The first time I did this, my 5-year-old walked in and yelled "MOMMY'S GIVING THE CHICKEN A MASSAGE!" and honestly, that's not inaccurate.

